
When I think of fall, I think of damp and windy weather and a hot coffee in my hand. Mums, pumpkins, boots and fall festivals are also on the list. One of my favorite places to go a couple of times each year is the Hobnob Market in central Illinois. I especially love the fall market! The vendors are so creative and rustic treasures are everywhere.
The Market
I was so excited to be going to this fall market with my mother-in-law. We hit the road (about and hour and a half drive for us) with our pumpkin spice coffees in hand and prayed we wouldn’t run into the storms that were scattered across the area. No such luck, it poured. We actually had to pull off the interstate for about 25 minutes to let the worst of it pass us. Eventually we made it, and all the white knuckle driving had me ready for a nice glass of wine. One of my favorite things about the Hobnob Market is being able to browse around with a glass of wine in my hand!

Due to our weather delay, we were already running short on time. The market was only open for another 45 minutes or so and we had just started looking. I had focused vision, I knew I wanted to find something to bring home and use on the blog, but time as running out. We dodged a couple more downpours and decided to go through one last tent before calling it a night and there it was!

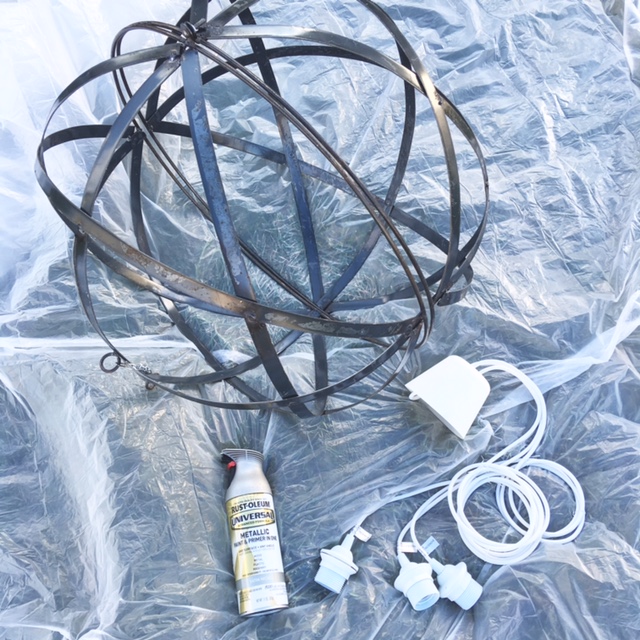
A large iron garden orb for $35! I had been brainstorming ways to make a DIY orb chandelier, but never found exactly what I was looking for. Boy, am I glad I held out, because this was one of those purchases that leaves you with no guilt!
DIY orb chandelier

The rustic feel of the iron orb was really nice, but all of the finshings in my house are brushed nickel. I even tried it out “as is”, but found it to be a little harsh against the rest of my decor. I knew I had to paint it to make it work in my house.

Enter Rust-Oleum Universal Metallic paint and primer in satin nickel finish. This product is amazing. I was a little worried about the finish being too shiny or sparkly, but it was actually perfect! I followed the directions and quickly wiped down the surface to be painted and did about 4-5 light coats. The coats were done one right after the other and I had no drips. My only complaint was that one of the cans clogged and it took a couple minutes of messing with the spay lever to get it working again. (Of course it was pointed at my face when it unclogged, my daughter thought that was hilarious.)


It dries to touch really quickly, so it’s really easy to get all angles covered (the can even works upside down!). The orb itself took two cans to cover. Considering all the edges and covering both the inside and outside of the orb, I thought this was reasonable. Ideally, it would have been best to hang the orb from something like a tree branch while painting, I think this would have required significantly less paint. If you’re like me, and live in a neighborhood with no trees, a drop cloth on the grass is your best bet.
In closing…
Overall, this was a major success and I highly recommend this Rust-Oleum product for an easy and inexpensive DIY transformation! I feel like the possibilities are endless. Need to update all that old shiny brass hardware throughout your house? You’ve probably been putting it off because of expense… Imagine the money you would save if you just spay painted a new finish! I would love to see some of your updates!
Thank you so much for taking the time to visit today and I would love to hear your thoughts!!


Stay tuned for part two, where I’ll be finishing this DIY orb chandelier project by walking you through wiring and hanging!


